
Intro
Posts like this one don’t age well. Tooling changes all the time. And the other thing is: I do Haskell just for fun, ie silly little exercises with only pure functions. So take this setup with a grain of salt. And if you stumbled on this from the future, there’s probably better options for you.
With these disclaimers out of the way, let’s see the setup.
Goal
Basically I’m trying to replicate what I had with HaskellForMac. That IDE/Playground was great for me. A no hassle environment for my little exercises. Unfortunately it seems to have been abandoned (last update was in 2018, the included ghc version is old, it didn’t make the Apple Silicon transition, etc).

Haskell Installation
The first thing we need is a Haskell installation. Here I went with GHCup. Just follow their instructions. GHCup helps you install ghc, cabal, stack, the lsp server etc. Don’t aim for the latest and greatest. Important for example is that hls supports the ghc choice you make. I always choose the recommended tag.
Add ~/.ghcup/bin to your $PATH.
Emacs setup
Next we need to set up an editor which in my case is Emacs. Emacs is my goto choice when a specialized IDE is not available (like Goland for Go or Clion for C++). Check out Emacs Tutorial and Mastering Emacs for a way into Emacs Zen 😀 For the record, I’m on the Emacs side of Emacs vs Vim 🙂. I’m also on the Spaces side of TABs vs Spaces .
For working with Haskell in Emacs, follow Emacs Haskell LSP or if you prefer a more thorough guide: LSP-Mode.
I had to make one little tweak in ~/.emacs to get rid of an annoying warning related to company-mode, so here’s my version:
(package-initialize)

(use-package haskell-mode) ; install mode for Haskell files
(use-package lsp-mode) ; you will definitely need LSP support
(use-package lsp-haskell) ; you will definitely need LSP support
(use-package lsp-ui) ; that's a nice LSP package as well
;; finally, Haskell LSP setup:
(use-package lsp-haskell
  :hook
  (haskell-mode . lsp)
  (haskell-literate-mode . lsp))

(setq lsp-completion-provider :none)

(setenv "PATH" (concat (getenv "PATH") ":" (expand-file-name "~/.ghcup/bin")))
(setq exec-path (append exec-path '(expand-file-name "~/.ghcup/bin")))
I split my Emacs window into three windows:
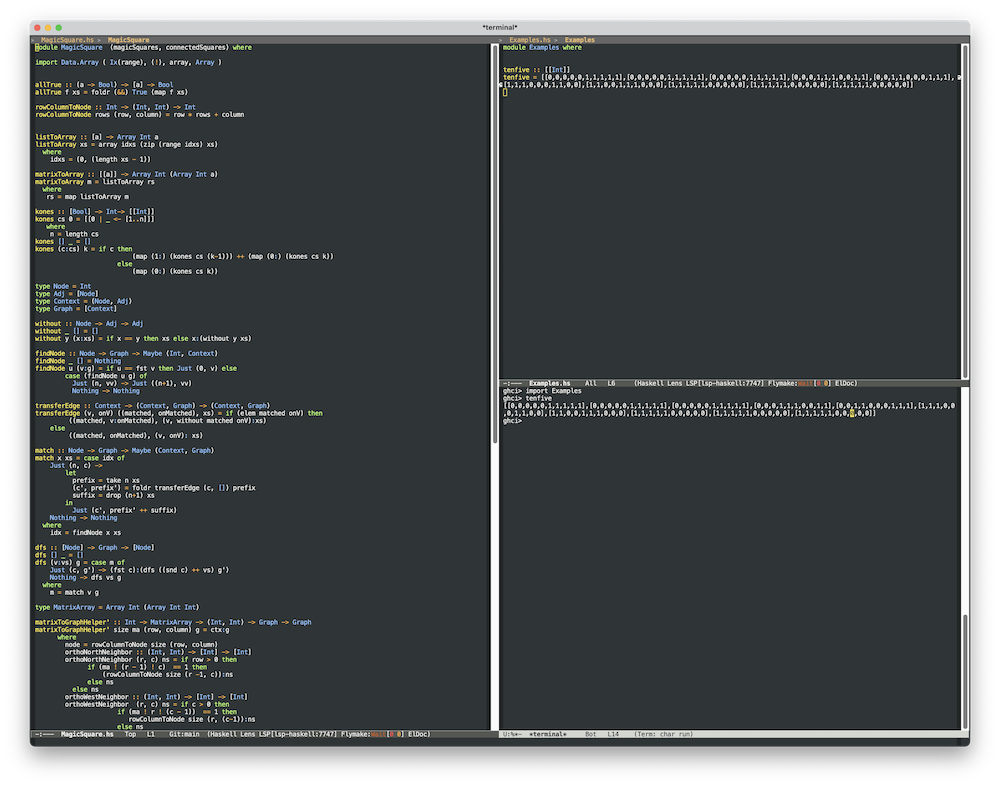
On the left is the library module code. The right window is split in two: on top I have an examples module where I define testing fixtures and on the the bottom is a GHCi interpreter session. One thing to note here about the bottom window and the GHCi session: I use the plain terminal emulator (M-x term) and not the emacs shell (M-x shell). I just cannot live without TAB completion in a shell.
Project setup
Again, I try to keep it simple:
cabal init
Fill out the form 🙂. I usually just choose “library”, no tests, no executable. If I feel ambitious, I choose “library and executable” and if I feel really ambitious I also tell it to generate the testing Main.hs. My naming choices also aim for simplicity and conformity, just to stay on the happy path of cabal. For example package will be named foo, library target will be foo. There will only be two modules: Foo and Examples. Executable will also be named foo.
To get into a GHCi session I use:
cabal repl
This will load in all your modules and import the library module (the Examples module you have to import manually once in the GHCi session).
If I do have an executable, I run it with cabal run foo -- -fooarg1 -fooarg2 but sometimes it’s useful to launch the executable directly so we need the path to where it was built:
cabal exec which foo
Look at magicsquare as an example project.
Side effects
I did say in the Intro of this post that I only play with Haskell and write pure functions that solve silly little exercises. But sometimes it is nice to visualize results. The aforementioned HaskellForMac IDE exposed CoreGraphics and SpriteKit APIs, which was really nice.
As a replacement I chose Mathematica. I already pay for a license. Mathematica has powerful graphics capabilities, so no concerns there. But how to integrate with Haskell. There is Mathlink and Mathlink Haskell package but the Haskell package hasn’t been touched in a long time I’m sure it can be brought up to speed but I lack the time and knowledge. I would love it if somebody would take this on. .
Instead of Mathlink I decided to again keep it simple by calling the Haskell executable as a subprocess from Mathematica and operating with the resulting stdout from the executable within Mathematica by transforming it into a Mathematica expression and visualizing it.
We’ll use magicsquare as an example to illustrate the approach. The notebook needs to live in the project directory. We can then say in the notebook:
SetDirectory[NotebookDirectory[]];
allowing the Notebook to have the same current directory as the cabal project. Next we augment our $PATH variable inside Mathematica to be the same as in an outside shell:
SetEnvironment["PATH" -> Import["!source ~/.zshrc; echo $PATH", "Text"]];
We’re ready to run the cabal target (in this example it’s the target magicsquare with arguments 8 4 2):
ms = ExternalEvaluate["Shell", "cabal run magicsquare -- 8 4 2"]
The returned object has the “StandardOutput” property that contains the stdout from our Haskell executable.
What follows is project-specific. Depending on what the Haskell executable spits out, we transform the output into a valid Mathematica expression. In the case of magicsquare it is a Haskell list of ones and zeros, so it’s an easy transformation:
toMMA[s_String] :=
ToExpression[StringReplace[s, {"[" -> "{", "]" -> "}"}]];
We can then use it, plot it, throw whatever Mathematica powers we have at our disposal:
plotRow[xs_] := GraphicsRow[ArrayPlot[#, Mesh -> True] & /@ xs, 5];
plotRow[toMMA[ms["StandardOutput"]]]

And there you have it. The setup is a little MacOS-centric, but not too bad. And yes, Mathematica is pricey and a bit of a luxury here.